Table of Contents
Quick Overview
- Spread, do not stack. A spread layout exposes more panel perimeter to the room and performs noticeably better than the same panels grouped together.
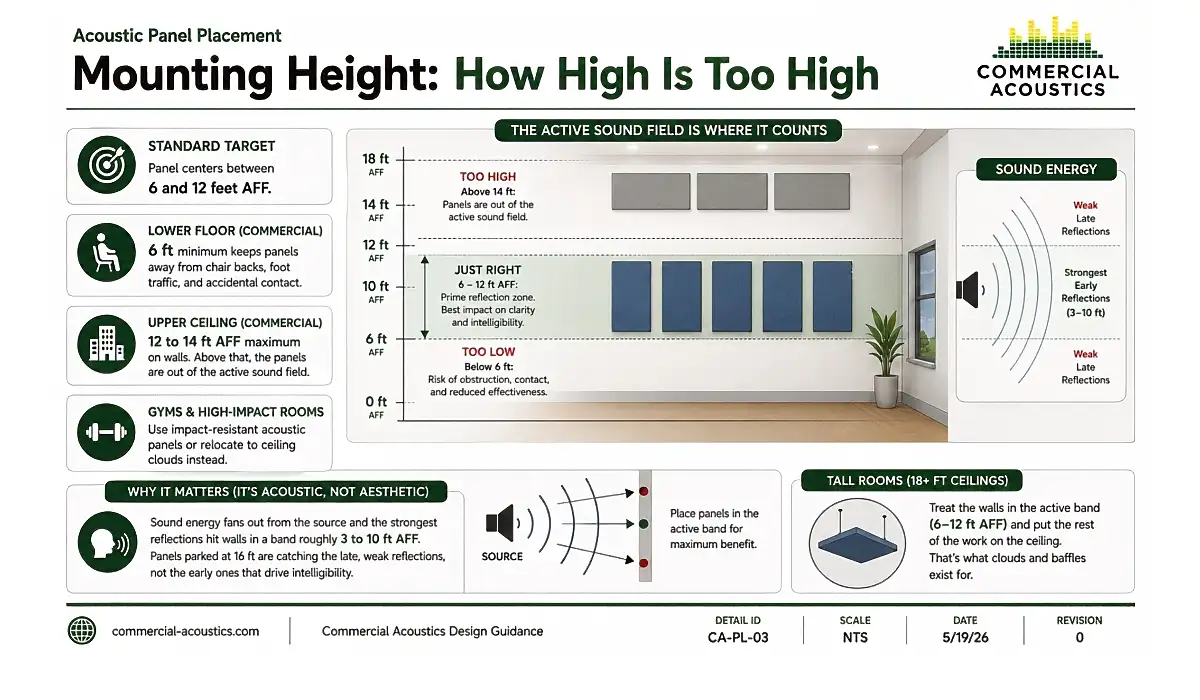
- Mount within the sound field. Keep panel centers between 6 and 12 feet AFF on walls. Above 14 feet, energy reaches the panel too late to control early reflections.
- Never leave two parallel walls bare. Untreated parallel surfaces produce flutter echo and standing waves, even in small rooms.
- Plan for 25–35% surface coverage in general commercial rooms, up to 50% for studios and critical-listening spaces.
The Three Core Placement Rules
- Symmetry: Balance panels around the room’s primary axes. Doors, windows, and HVAC vents already establish a rhythm. Match that rhythm where possible.
- Spread: Distribute panels across multiple walls and avoid clustering in a single corner. Coverage area matters less than perimeter exposure.
- Height discipline: Keep panels within the working sound field. Mounting too high looks neat but lets early reflections bypass the treatment.
Our install crews follow these three rules on every project before they hang the first panel. They are not aesthetic preferences. They are the lowest-effort way to keep an acoustic treatment from underperforming its lab NRC values by 20 to 30 percent.
When panel pattern has to break for an obstruction (an exit sign, a sprinkler head, an outlet), minimize the change in spacing rather than relocating the whole row. Small breaks read as intentional. Large gaps read as accidents.
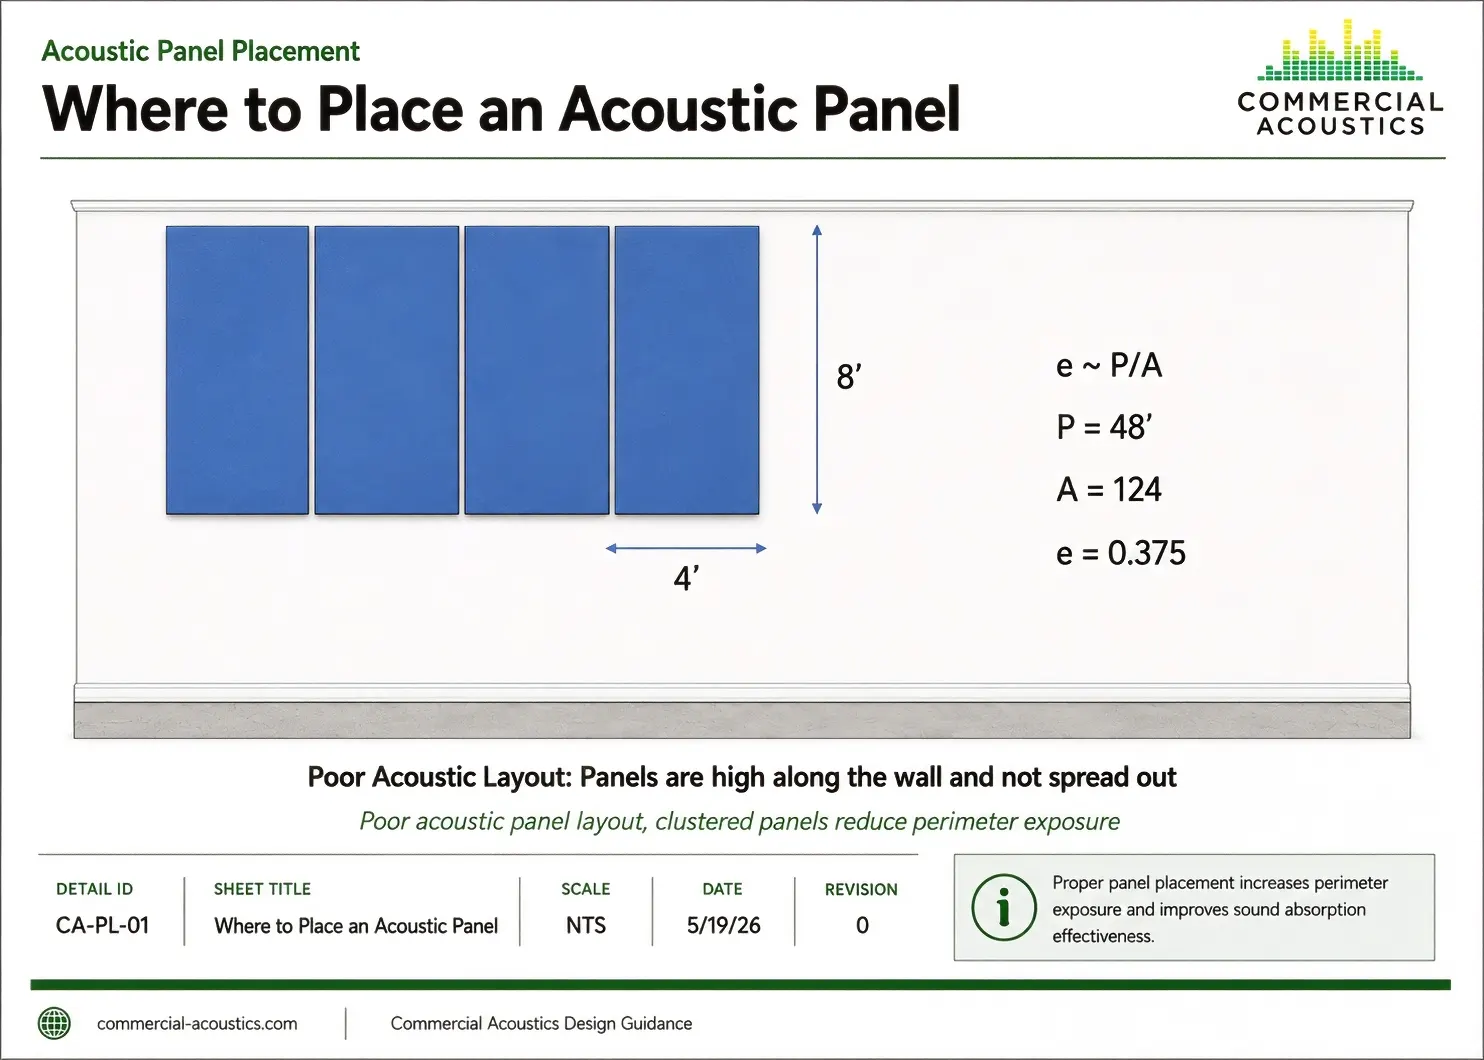
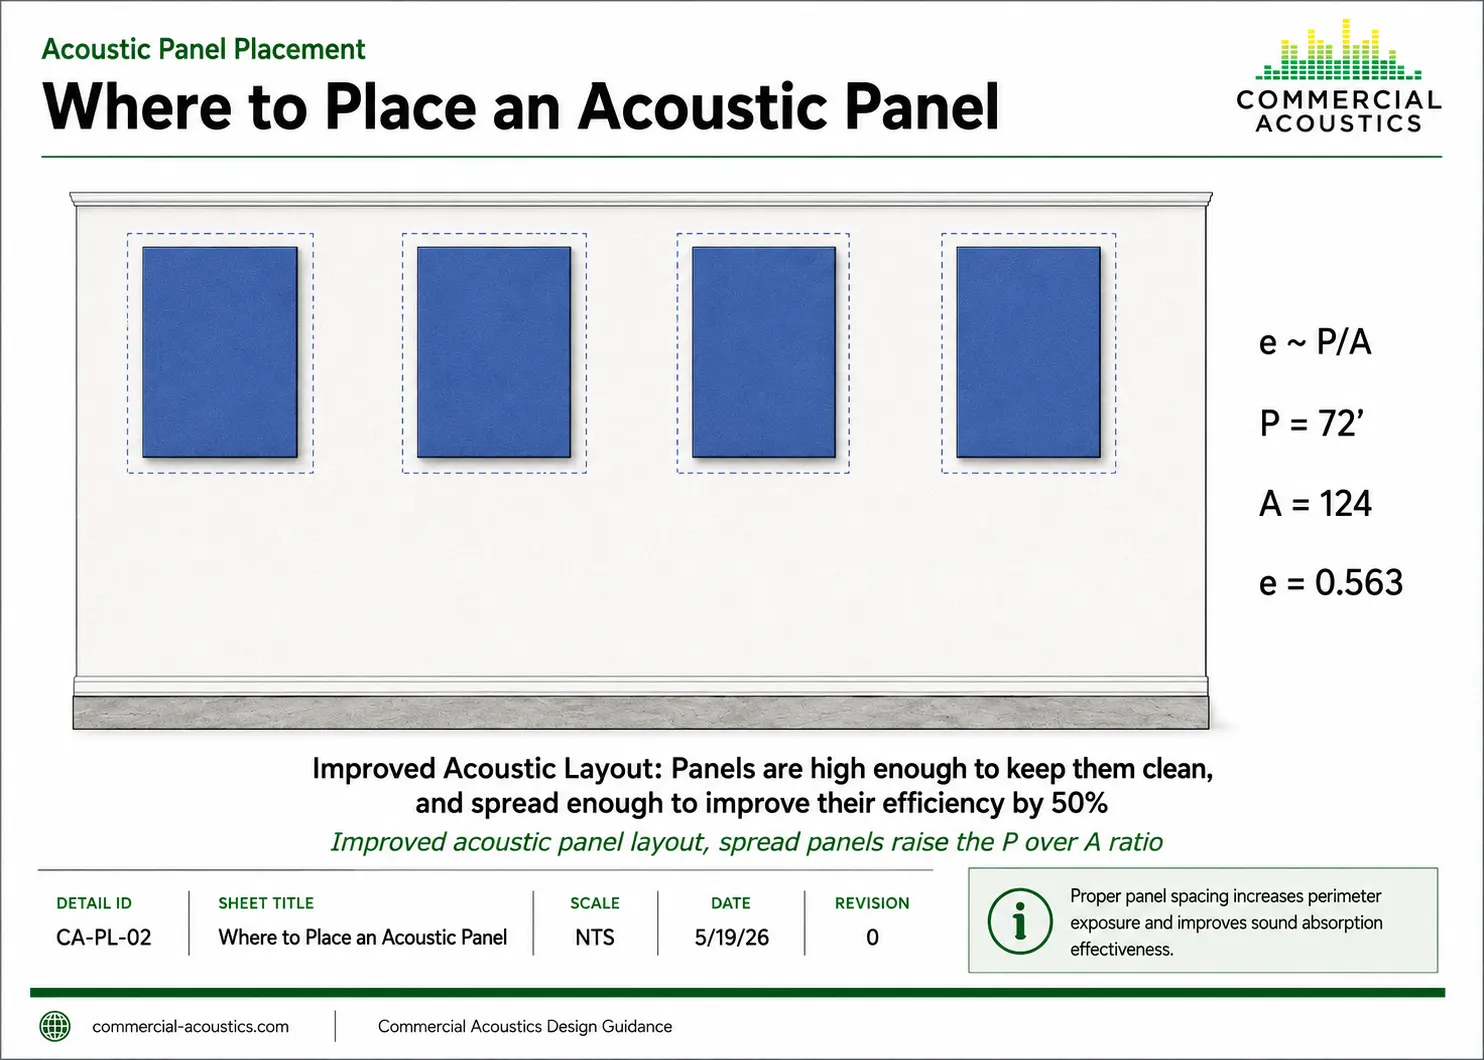
The Perimeter-to-Area Principle (e ~ P/A)
- Efficiency formula: e ~ P / A, where P is total perimeter of the treatment and A is total panel area.
- Same panels, different layout, different result. Area stays constant. Perimeter grows when panels are spread apart.
- Why it matters: Sound interacts with a panel most strongly at its edges. More edge equals more absorption.
Take four 4’×8′ panels (128 sq ft total). Push them together with long edges touching and you get a single 4’×32′ block, which has 72 ft of perimeter. Spread them out with 4 ft gaps between and the same four panels expose 96 ft of perimeter.
That is a 33% jump in edge exposure for the same panel count and the same square footage of fabric. In practice, layouts with strong P/A ratios cut reverberation 20 to 50 percent more effectively than dense, clustered layouts of identical panels.
For an absorption coefficient reference by material and frequency, the sound absorption coefficient chart shows how panel core type interacts with the P/A advantage. High-NRC cores benefit more from a spread layout than low-NRC cores.
Mounting Height: How High Is Too High
- Standard target: Panel centers between 6 and 12 feet AFF.
- Lower floor (commercial): 6 ft minimum keeps panels away from chair backs, foot traffic, and accidental contact.
- Upper ceiling (commercial): 12 to 14 ft AFF maximum on walls. Above that, the panels are out of the active sound field.
- Gyms and high-impact rooms: Use impact-resistant acoustic panels or relocate to ceiling clouds instead.
Designers love hanging panels above eye level because it hides minor installation imperfections and protects the fabric face. The problem is acoustic, not aesthetic. Sound energy fans out from the source and the strongest reflections hit walls in a band roughly 3 to 10 ft AFF. Panels parked at 16 ft are catching the late, weak reflections, not the early ones that drive intelligibility.
In tall rooms with 18+ ft ceilings, treat the walls in the active band and put the rest of the work on the ceiling. That is what clouds and baffles exist for.
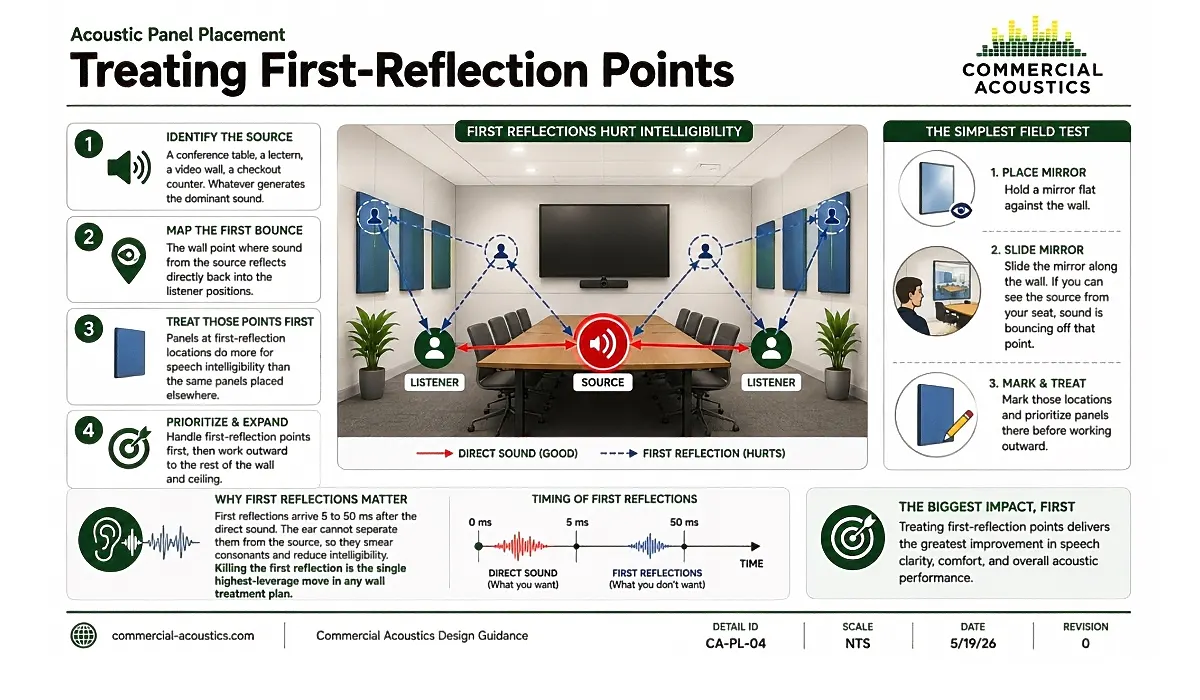
Treating First-Reflection Points
- Identify the source: A conference table, a lectern, a video wall, a checkout counter. Whatever generates the dominant sound.
- Map the first bounce: The wall point where sound from the source reflects directly back into the listener positions.
- Treat those points first. Panels at first-reflection locations do more for speech intelligibility than the same panels placed elsewhere.
First reflections arrive 5 to 50 ms after the direct sound. The ear cannot separate them from the source, so they smear consonants and reduce intelligibility. Killing the first reflection is the single highest-leverage move in any wall treatment plan.
The simplest field test: place a mirror flat on the wall and slide it along the surface. Anywhere you can see the dominant source from the listener position, sound is also bouncing off that point. Mark those locations and prioritize panels there before working outward to the rest of the wall.
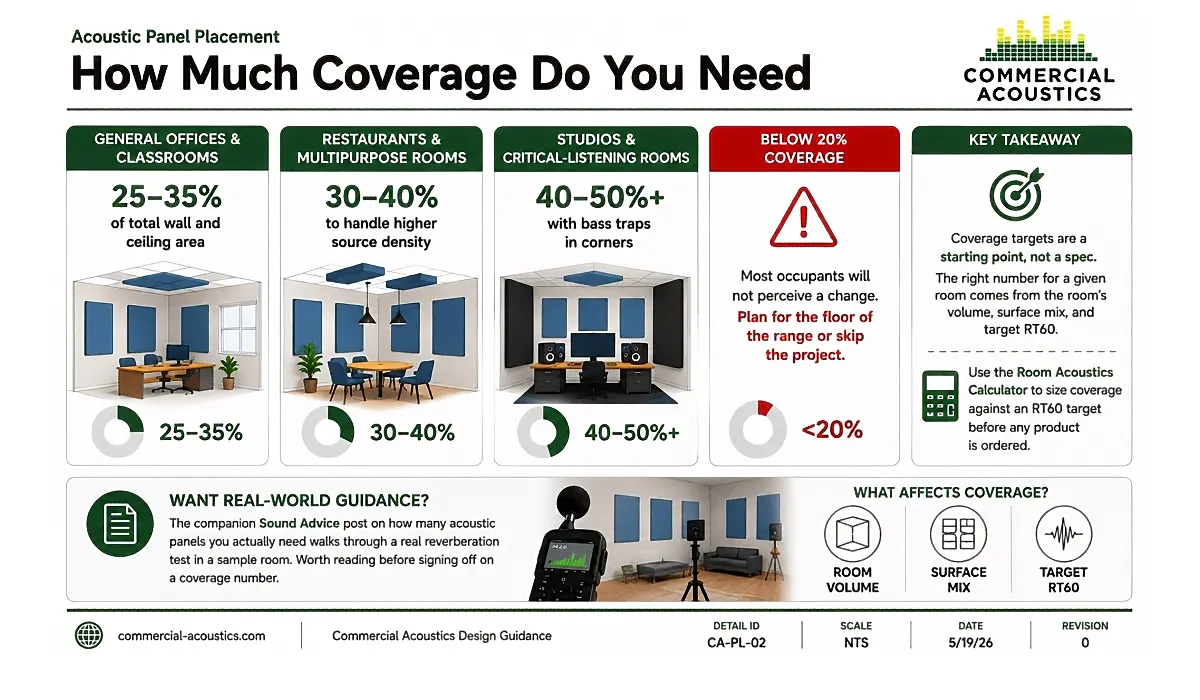
How Much Coverage Do You Need
- General offices and classrooms: 25–35% of total wall and ceiling area
- Restaurants and multipurpose rooms: 30–40% to handle higher source density
- Studios and critical-listening rooms: 40–50%+ with bass traps in corners
- Below 20% coverage: Most occupants will not perceive a change. Plan for the floor of the range or skip the project.
Coverage targets are a starting point, not a spec. The right number for a given room comes from the room’s volume, surface mix, and target RT60. The room acoustics calculator sizes coverage against an RT60 target before any product is ordered.
The companion Sound Advice post on how many acoustic panels you actually need walks through a real reverberation test in a sample room. Worth reading before signing off on a coverage number.
When to Switch to Ceiling Clouds or Baffles
- Ceiling clouds: Suspended horizontally 12–18 in below the deck. Best in rooms with high or exposed ceilings.
- Vertical baffles: Better for very large or industrial spaces where lateral spread is the dominant issue.
- When walls run out: If usable wall area is consumed by glazing, casework, or AV displays, the ceiling is the next move.
In rooms with limited usable wall surface, the ceiling carries the treatment. Ceiling clouds with NRC 0.90–1.15 cut vertical reflections aggressively and keep the room visually open. In gyms, cafeterias, and warehouses, vertical fabric-wrapped baffles handle lateral energy that wall panels cannot reach.
The same P/A principle applies to ceiling treatments. Five baffles spread across a 40-ft span outperform the same five baffles bunched together. Spacing follows the same rule as wall panels.
Acoustic Panel Layout: Do’s
- Distribute symmetrically against the room’s primary axes. Doors, windows, and lighting grids set the rhythm.
- Treat both pairs of parallel walls. Even small rooms generate flutter when one pair is left bare.
- Hit first-reflection points first. Those locations carry the most acoustic weight per panel.
- Use impact-rated panels in gyms, schools, and other high-traffic environments.
- Spread for perimeter exposure, not for visual symmetry alone. P/A drives results.
Acoustic Panel Layout: Don’ts
- Do not cluster panels in one corner. P/A collapses and the panels stop earning their square footage.
- Do not mount above 14 ft AFF on walls. The sound field will pass under the treatment.
- Do not hide panels behind furniture. Anything blocking the panel face cuts effective absorption sharply.
- Do not place panels below 5–6 ft AFF in commercial settings. Bumps, scuffs, and fabric damage are inevitable.
- Do not leave two parallel walls untreated. Even a small classroom develops a noticeable flutter when this rule is broken.
Pulling It Together
The best-performing acoustic layouts are not the prettiest renders. They follow three durable principles: distribute panels across multiple surfaces, mount them in the active sound field, and treat first-reflection points before working outward.
The P/A principle is the simplest sanity check on any drawing. If the panels are clustered, the design is leaving performance on the floor. Spread the same panel count over more wall surface, hit a real coverage target, and the room will measure within the RT60 design intent.
Need a Custom Panel Layout?
Send a floor plan, ceiling height, and primary use, and we will return a panel count, layout, and coverage map sized to the room’s RT60 target. Commercial Acoustics handles design and supply for rooms across the country from offices and classrooms to gymnasiums and worship halls.
FAQs: Acoustic Panel Placement
Where should acoustic panels be placed in a room?
Distribute them symmetrically across multiple walls, prioritize first-reflection points, and keep panel centers between 6 and 12 feet AFF. Treat both pairs of parallel walls.
How high should acoustic panels be mounted?
Panel centers between 6 and 12 ft AFF on walls. Above 14 ft, sound bypasses the treatment. Below 5 ft, panels get bumped and stained.
How many acoustic panels do I need?
Plan for 25–35% of wall and ceiling surface in general rooms, 30–40% in restaurants, and 40–50% in studios. Use a calculator against an RT60 target.
Why does spreading panels out work better?
Sound interacts most strongly at panel edges. A spread layout has more total perimeter per square foot, which raises the effective absorption coefficient.
Can I place all panels on one wall?
No. A single-wall layout leaves the opposite wall reflective, which generates flutter echo and standing waves. Always treat both pairs of parallel walls.

Walker Peek|Founder & CEO, Commercial Acoustics
Walker founded Commercial Acoustics in 2013 to bring aerospace-grade engineering discipline to soundproofing, and runs the firm as CEO from its 12,000 sq ft Tampa production facility. The company designs custom acoustic panels, sound membranes, and masking systems for multi-family, hospitality, healthcare, and commercial projects across the US — built around Walker’s invention, Wall Blokker, an EVA-based sound barrier that hits STC 50-plus at roughly $1 per square foot installed.
A Jacksonville native, Walker spent five years at Kennedy Space Center with Craig Technologies before founding Commercial Acoustics — certifying aerospace manufacturing to the AS9100 standard and leading Six Sigma Black Belt process-improvement teams on NASA programs. He is a certified Industrial Noise Control Engineer and the author of Architectural Acoustics: A Practical Handbook.