
Table of Contents
Why Acoustic Details Matter
Specifying high-STC walls and IIC-rated floors is only half the battle—real-world performance is won or lost in the details. Accurate acoustic details are a critical element to any project’s ultimate success. Doors, outlets, sprinklers, ducts, and mechanical connections create flanking paths that let sound bypass otherwise solid assemblies, leading to complaints and costly fixes.
Acoustic Requirements for Penetrations
Penetrations are the most common weak points in partition performance. Even a well-tested wall can underperform if doors leak, outlet boxes are back-to-back, or life-safety penetrations are hard-coupled to drywall. Treat these details early to protect STC in the field and reduce post-occupancy issues.
Common Acoustic Penetrations:
- Doors: Install rubber or plastic door sweeps and perimeter weather-stripping on doors to noisy spaces (mechanical, trash, copy/print). If light is visible around or under the door, sound will leak—tighten hardware and replace seals as needed.
- Exterior openings: Weather-strip all exterior doors and windows to block traffic and environmental noise. Proper sealing improves both acoustic privacy and energy performance.
- Outlet boxes: Do not place outlets back-to-back; stagger with only one box per stud cavity and keep boxes at least 24″ apart. Leave a 1/8″–1/4″ gap around boxes and fill with a 3/8″ continuous bead of acoustical caulk, then apply STC-rated putty pads on the box backs.
- Switch plates & low-voltage: Add gaskets to all switch plates and data/AV plates. Small air gaps here often become the first flanking path in offices and classrooms.
- Sprinklers & fire/smoke dampers: Cut a 1/8″–1/4″ clearance around penetrations and seal with acoustical caulk to avoid rigid connections. This preserves the wall’s isolation without compromising life-safety components.
- Glazing at sidelites: Use acoustically rated gaskets and ensure continuous perimeter sealant. Unsealed joints around frames can negate a high-STC door or wall.
- Baseboards & trims: Seal wall-to-floor intersections before trim is installed. Decorative base alone won’t stop air—and sound—movement.
When penetrations are overlooked, even the best-rated assemblies fall short once tested in the field. By tightening these small but critical details—seals, gaskets, caulks, and clearances—you maintain the intended STC rating and deliver a space that truly performs. For architects and contractors, getting penetrations right is one of the simplest ways to ensure long-term client satisfaction and reduce costly callbacks after occupancy.

Preventing Structure-Borne Noise
Vibration and rigid connections can short-circuit isolation layers and move noise through the structure. Focus on separation at intersections, resilient underlayment perimeters, and proper support of equipment so impact and mechanical energy don’t travel room-to-room.
Common Ways to Prevent Structure-Borne Noise:
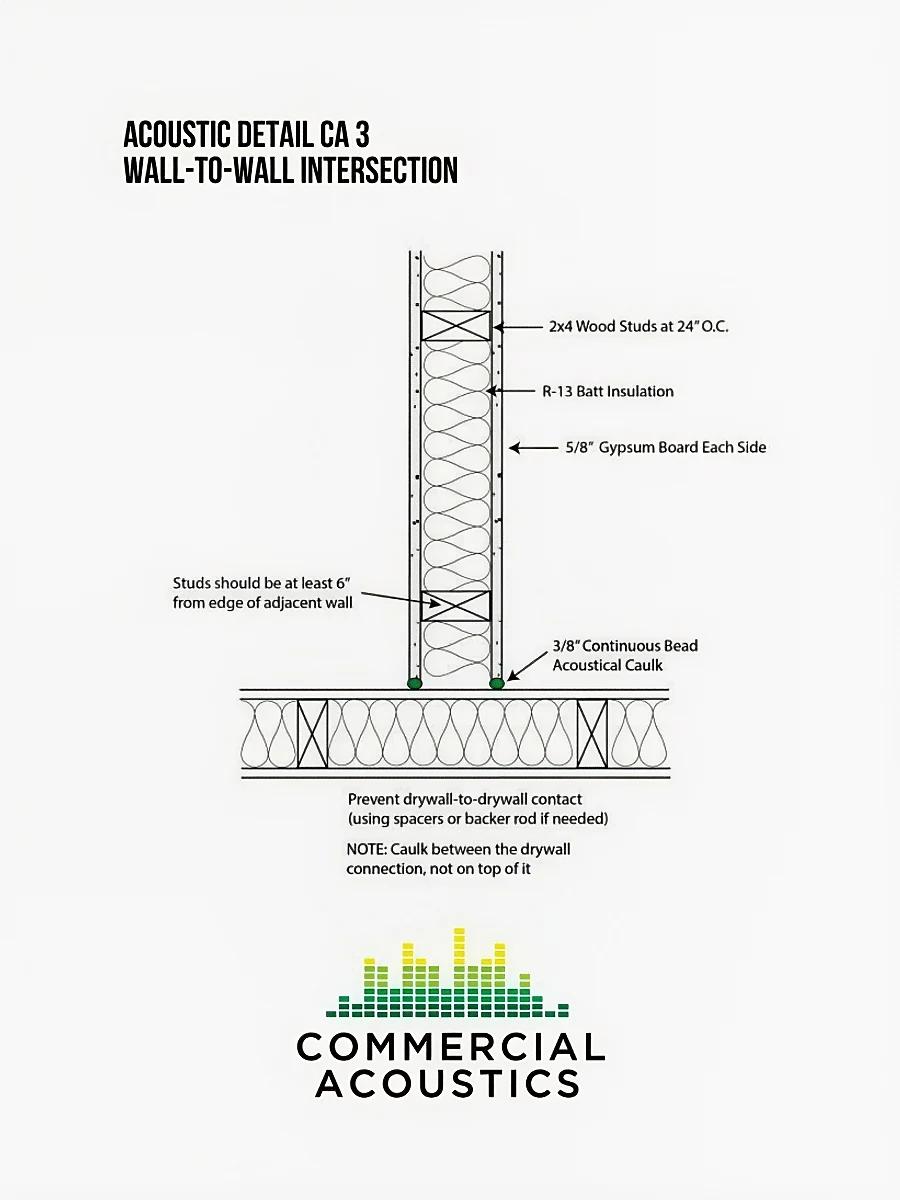
- Wall-to-ceiling joints: Use backer rod or spacers to prevent drywall-to-drywall contact; seal within the joint with acoustical caulk. This limits vibration bridging at the boundary.
- Perimeter isolation at floors: Install isolation strips before gypcrete or underlayment pours to decouple from walls. Without these, impact energy skirts around the floor system and into adjacent spaces.
- Floating finishes: Maintain manufacturer-recommended gaps at tile, LVT, and wood around room perimeters; infill with compliant backer/sealant. Hard edge contact defeats resilient layers.
- Mechanical supports: Mount RTUs, pumps, and air handlers on neoprene pads or spring isolators sized for load/frequency. Direct bearing on slabs or steel frames will transmit low-frequency rumble throughout the building.
- Resilient channel: Verify orientation, spacing, and fastener length; never “ground” RC into studs or joists. A single improper screw can drop wall performance by 5–10 STC points.
- Stair & guard connections: Where feasible, use isolation bushings or pads at steel-to-structure connections. Footfall and handrail impacts otherwise telegraph into adjacent suites.
Structure-borne noise is one of the most persistent challenges in acoustical design because it moves invisibly through rigid connections. By isolating walls, floors, and mechanical equipment with proper detailing, you prevent vibration from spreading across the structure and undermining rated assemblies. These precautions may seem small during construction, but they are critical for delivering predictable performance and comfort in multifamily, healthcare, and commercial projects.
Preventing HVAC Noise
Ducts, chutes, and piping can act like express lanes for noise if they’re rigidly connected or left untreated. Wrap, isolate, and route services thoughtfully so airflow, equipment, and drops don’t become the dominant flanking paths in an otherwise quiet design.
Common Ways to Prevent HVAC Noise:
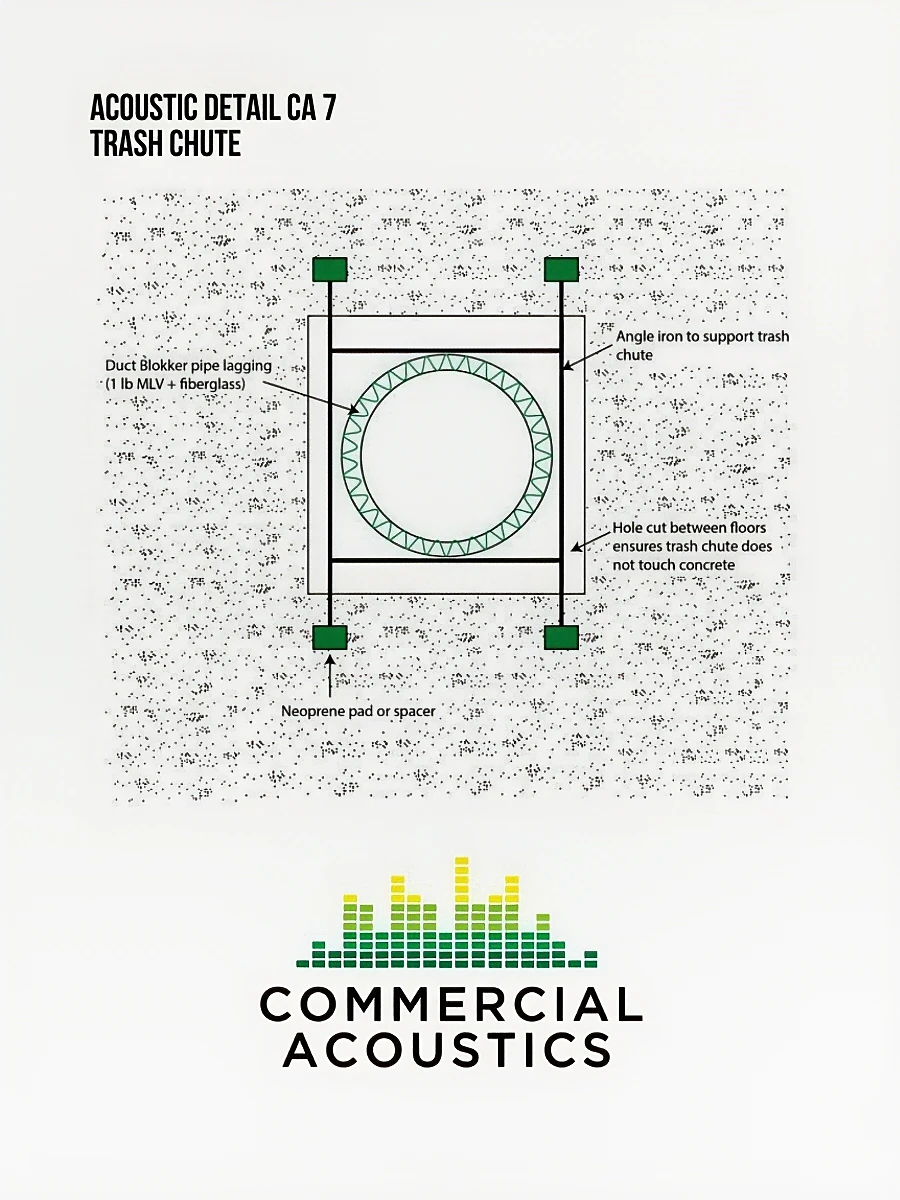
- Trash chutes: Wrap with pipe lagging (1 lb/sf MLV + fiberglass) and isolate supports with neoprene pads; avoid rigid contact at floor penetrations. This treatment dramatically reduces chute roar and impact clatter.
- Piping: Prevent pipe-to-drywall contact using cushioned hangers and lagging at problem runs. Route noisy lines away from grilles/registers and through separate stud cavities to avoid coupling into ductwork.
- Duct silencers & flex connections: Use lined duct sections, silencers, or short flex connectors at penetrations and equipment takeoffs. Without attenuation, ducts bypass wall assemblies and carry speech directly between rooms.
- Return air paths: Where transfer grilles are required, size and line them for low velocity and include baffles. Poorly detailed returns are a frequent cause of intelligible cross-talk between spaces.
- Terminal units & diffusers: Isolate VAV/FCU units from structure and select low-NC diffusers near sensitive spaces. Commission for airflow and balance—overspeed conditions raise noise and complaints.
HVAC systems are often the hidden culprit behind noise complaints, carrying sound across floors and between rooms when not properly treated. By isolating trash chutes, wrapping pipes, and adding silencers or flex connections at key points, designers can eliminate these flanking paths before they become costly problems. Careful detailing of air handling and duct distribution ensures that comfort, privacy, and acoustic performance are maintained long after the system is commissioned.
Importance of Acoustic Details in Construction
Drawings are only as good as field execution. Workmanship-dependent elements—like resilient channel, perimeter isolation, and sealant continuity—require verification to achieve the intended STC/IIC. Incorporate hold points, mockups, and photo documentation so critical details aren’t missed during fast-track schedules.
Why Acoustic Details are Important:
- Preconstruction alignment: Review acoustic details with drywall, MEP, and fire-protection trades to assign responsibility for seals and clearances.
- Mockups & inspections: Build a representative wall/ceiling bay with outlets, RC, and penetrations; verify fastening and sealing before production work.
- Submittals: Require product data for putty pads, acoustical sealant, isolation strips, lagging, and vibration isolators—no substitutions without review.
- Punch & post-occupancy: Inspect doors, trims, and penetrations for visible light or air leaks; schedule a tuning visit if sound masking or HVAC adjustments are part of the design.
Acoustic details only succeed when they’re built with the same care they’re drawn. Field inspections, mockups, and submittal reviews ensure the assemblies perform to their rated STC and IIC values rather than falling short due to overlooked workmanship. By treating construction oversight as part of the acoustic design process, architects and contractors can safeguard project performance, reduce liability, and deliver spaces that meet client expectations from day one.
Conclusion: Professional Oversight for Lasting Results
Acoustic success is won in the details—tight doors, sealed boxes, isolated perimeters, and quiet services. When these items are designed clearly and verified in the field, projects meet their target STC/IIC, reduce complaints, and deliver the privacy and comfort clients expect.
Commercial Acoustics supports architects and contractors with drawings, product guidance, and construction administration so designs perform in the real world. Build these checklist items into your next project and lock in predictable, durable acoustic performance.
FAQs: Acoustic Detailing & Field Performance
What causes poor field STC results?
Missed acoustic details—like unsealed doors, back-to-back outlets, or grounded resilient channels—let sound bypass rated assemblies. Even small gaps or rigid contacts can drop performance by several STC points.
How do you maintain ratings during construction?
Review acoustic details early with all trades. Use mockups, proper sealants, and verified isolation methods before walls close to keep STC and IIC values consistent in the field.
Why do HVAC systems create noise issues?
Without acoustic details, ducts and pipes carry sound between rooms. Adding flex connectors, liners, and lagging stops vibration and airflow noise from spreading through the structure.
How can structure-borne vibration be reduced?
Use isolation pads, perimeter strips, and backer rod at wall joints. These simple acoustic details prevent vibration from traveling through connected materials.
How does Commercial Acoustics support projects?
We review drawings, refine acoustic details, and guide installation to ensure real-world performance. Our team helps architects and contractors achieve predictable, high-quality acoustic results.