Table of Contents
Avoiding the Pitfalls of Poor Soundproofing
Soundproofing isn’t just about more drywall or insulation. Some common mistakes actually make things worse—costing time, money, and performance. Below are ten pitfalls we see most often, plus how architects, contractors, and owners can avoid them.
Poor acoustic design shows up everywhere—from multifamily housing to offices and schools. Misusing resilient channel, ignoring flanking paths, or trusting inflated STC and IIC ratings are common soundproofing mistakes that compromise comfort and privacy. Knowing how to spot and correct these errors helps project teams deliver spaces that perform as intended.
1. Mounting Objects on Resilient-Channel Walls
- Structural bridges: TVs, cabinets, and shelves short-circuit isolation
- Measured drop: Typical STC reduction of ~5–6 points
- Planning first: Use drywall-only anchors or alternate backing
Resilient channel improves wall STC ratings by decoupling drywall from studs, but that benefit disappears when objects are mounted directly into framing. TVs, cabinets, and shelves create rigid connections that short-circuit the isolation system.
This mistake can lower performance by 5–6 points or more, leaving the wall no better than a standard assembly. Planning furniture layouts and using drywall-only anchors or backing strategies is essential for resilient channel to work.
2. Poor Resilient-Channel Installation
- Common errors: Wrong spacing, upside-down rails, bad splices
- Alignment matters: Notches should not land over studs
- Field checks: CA/QC walks to verify orientation & fastening
Resilient channel only performs when installed correctly, yet common soundproofing mistakes often sabotage results. Misaligned notches, inverted rails, or bad spacing create sound bridges that transfer vibration. Even with proper specs, poor field execution can erase acoustic gains. Clear drawings, crew training, and inspections are essential on any soundproofing project using RC.
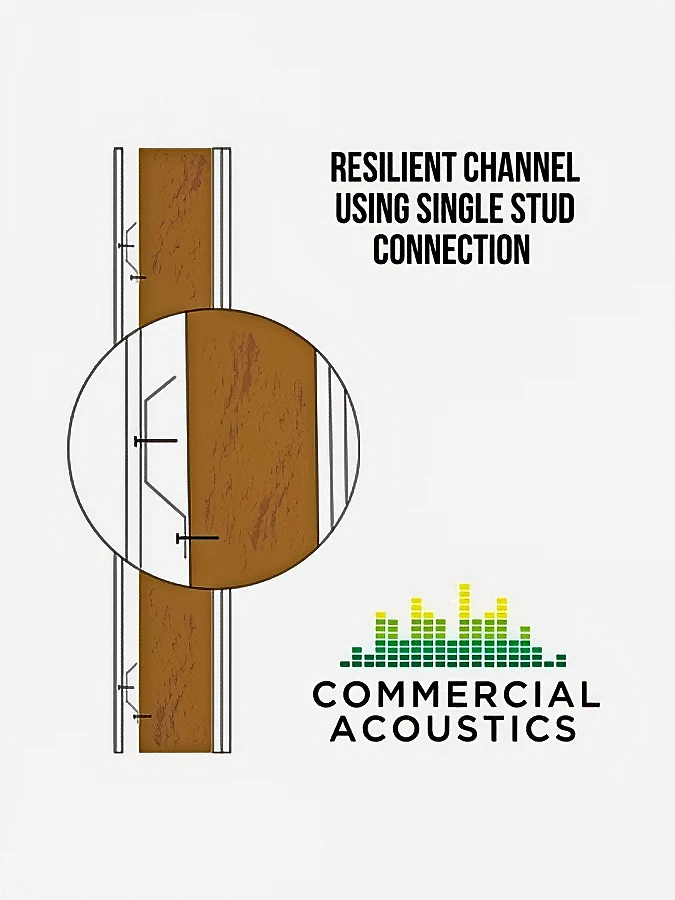
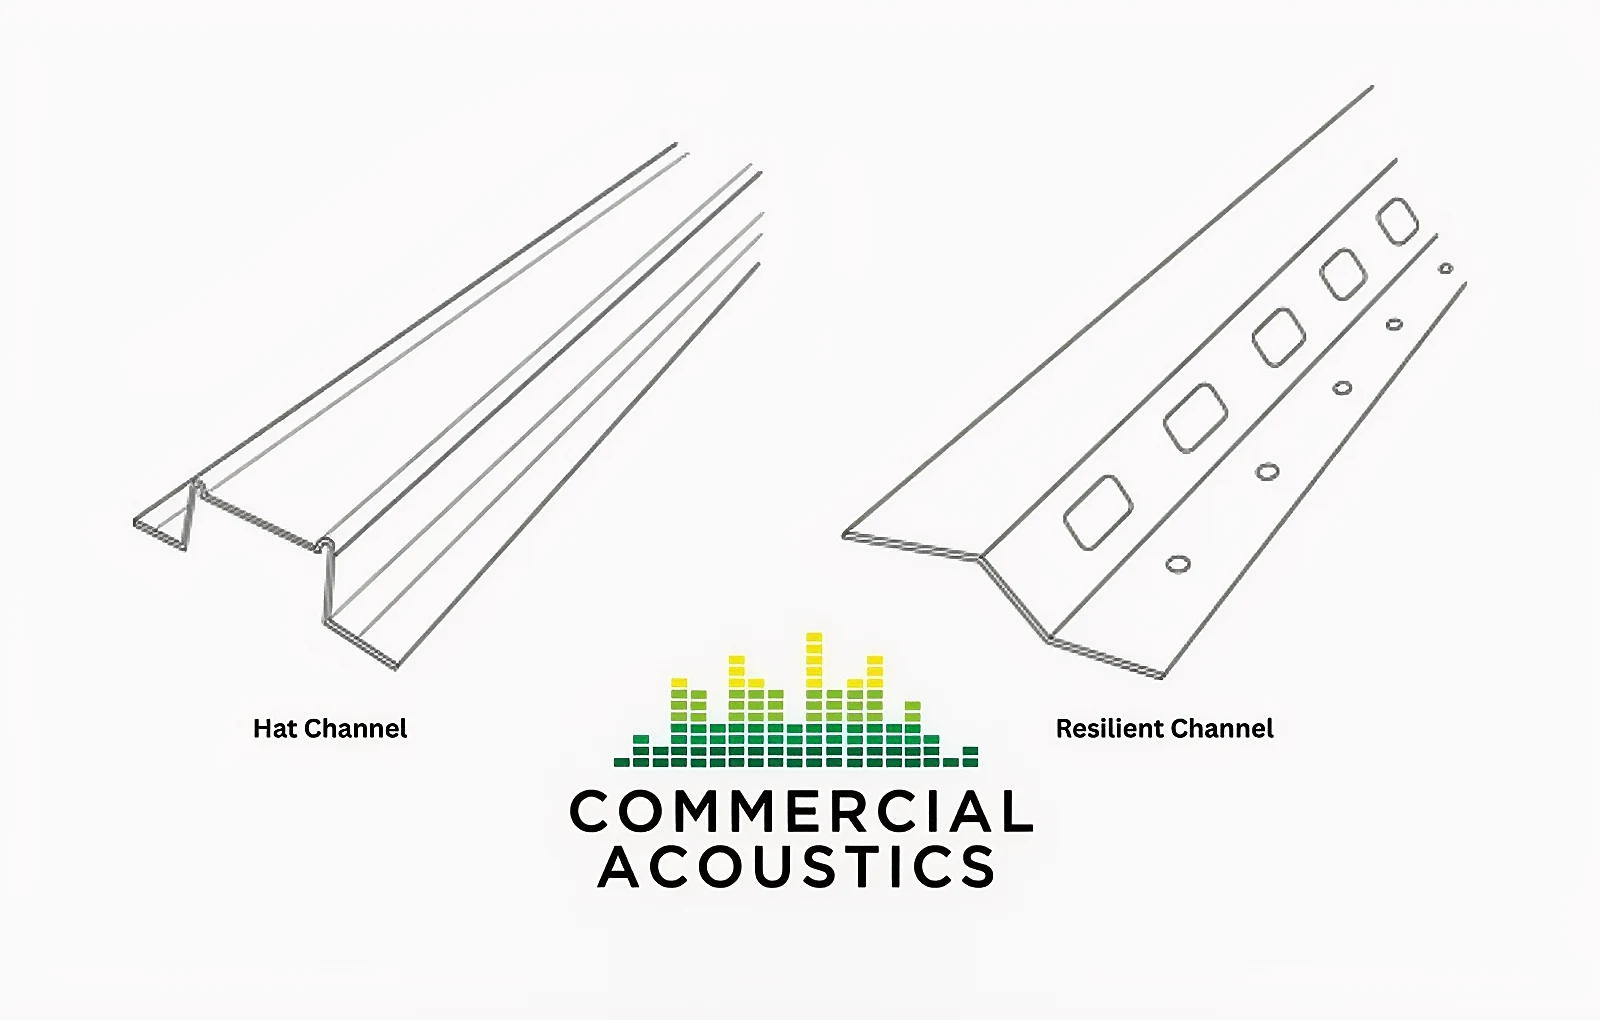
3. Confusing Hat Channel with Resilient Channel
- Two vs. one leg: Hat channel touches studs in two places
- STC impact: Hat channel offers negligible isolation
- Spec clarity: Call out “resilient channel,” not just “channel”
Despite looking similar, hat channel and resilient channel aren’t interchangeable—a common soundproofing mistake in construction. Hat channel touches studs at two points, letting vibration pass through the wall. Resilient channel, with its single-leg connection, isolates drywall and boosts STC. Any wall requiring acoustic performance must clearly specify and verify resilient channel use.
4. Treating UL Fire Assemblies as Acoustic Ratings
- Different metrics: UL = fire; STC/IIC = acoustics
- Variable results: Stud gauge/spacing changes performance
- Verify: Use lab data or an acoustic consultant
UL assemblies are often mistaken for acoustic test data, but they serve a very different purpose. Fire performance does not guarantee soundproofing, especially when construction details like stud gauge or spacing are changed. Copy-and-paste specifications often result in walls that fail to meet STC goals in practice. The only reliable way to confirm performance is through lab-tested acoustic assemblies.
5. Choosing Heavier Studs for “Better” Isolation
- Stiffer ≠ quieter: Heavier gauge raises stiffness & transmission
- Better choice: 25-gauge often outperforms for STC
- Use cases: Heavier studs only for span or loads
It seems logical that stronger walls block more sound, but acoustics don’t work that way. One common soundproofing mistake is assuming heavier-gauge studs improve isolation. In reality, they increase stiffness, allowing vibration to travel more easily. In most applications, 25-gauge studs outperform 20-gauge for sound isolation while also reducing costs. Only use heavier studs where structural requirements make them necessary.
6. Over-Relying on Multiple Drywall Layers
- Cost creep: More gypsum, modest acoustic gain
- Right role: Extra layers for fire rating, not isolation alone
- Smarter stack: Add membranes, damping, or isolation clips
Stacking drywall is one of the most common approaches to improve wall ratings, but it’s not very efficient. While thicker walls do add mass, they provide limited acoustic benefit compared to specialized materials. Products like damping compounds, sound membranes, or isolation clips achieve higher performance with less bulk. Extra drywall should be reserved for fire protection, not used as the primary acoustic strategy.
7. Ignoring Flanking Paths
- Doors/windows: Sweeps, seals, and leaf ratings matter
- Outlets/penetrations: Avoid back-to-back boxes; seal gaps
- Ceilings/HVAC: Treat plenums, diffusers, and duct paths
Another frequent soundproofing mistake is overlooking flanking paths. Noise leaks through gaps around doors, poorly sealed outlets, unlined ducts, and ceiling plenums. Even a small opening can reduce the effectiveness of a high-STC wall. Proper seals, acoustic details, and coordination between trades are essential to block these hidden sound paths and preserve performance.
8. Trusting Marketing Claims Over Lab Reports
- Assembly context: Ratings depend on the full build-up
- Fine print: Thick slabs & specialty ceilings inflate numbers
- Due diligence: Review independent lab tests, not ads
Product brochures often promise impressive STC or IIC numbers, but those ratings depend on ideal test conditions. A sound mat may advertise an IIC of 70, yet only provide a marginal improvement in real-world installations. One common soundproofing mistake is trusting marketing claims without verification—architects and contractors who do often end up disappointed during field testing. Always request independent lab reports for the full assembly to avoid costly surprises.
9. Overestimating Insulation Differences
- Thermal vs. acoustic: R-values don’t predict STC
- Material parity: Fiberglass, mineral wool, cotton ≈ similar
- Best practice: Fill ~60% of cavity with economical batt
Insulation helps break up cavity resonance, but different materials don’t vary much acoustically. Fiberglass, mineral wool, bonded cotton, or spray insulation all achieve similar STC ratings when installed properly. What matters most is that the cavity is at least 60% filled to disrupt sound waves. Paying more for “premium” insulation rarely delivers a measurable performance benefit.
10. Overlooking Low Frequencies & Floor Impacts
- STC limits: Doesn’t capture <100 Hz bass
- Concrete myth: Great STC, poor impact isolation
- Full coverage: Don’t spot-treat under gypcrete
STC ratings don’t account for bass or low-frequency noise, which are often the most disruptive in theaters, studios, and apartments. Concrete slabs may block airborne sound but still transmit heavy footfall and impact noise. Spot-treating under gypcrete or flooring creates weak points that leak sound across a structure. Continuous underlayment coverage and resiliently mounted ceilings are the best strategies for long-term IIC performance. Check out our floor underlayments to see fantastic options on how to reduce these low frequencies.
Real-World Soundproofing Applications
- Oklahoma Restaurant Soundproofing: Dining areas need acoustic control to keep conversation clear & separate from kitchen noise.
- Arkansas Industrial Factory Soundproofing: Machinery vibration & poor assemblies can create unsafe, noisy work conditions.
- California Multi-Family Soundproofing: Tenant complaints often stem from footfall, flanking noise, & low-frequency transmission.
These examples show how soundproofing mistakes impact different industries. In Oklahoma restaurants, poor planning makes dining noisy; in Arkansas factories, misused resilient channel or vibration issues drive costly fixes; and in California multi-family housing, missed underlayment or stud details lead to tenant complaints. Learning from these cases helps architects and contractors avoid similar pitfalls and deliver better-performing spaces.
Conclusion: Build Quiet the First Time
Most acoustic failures come from a few simple mistakes—missed details, poor specs, or bad assumptions. Get assemblies right, seal flanking paths, and verify results early. Avoiding these soundproofing errors saves money, prevents complaints, and ensures every project performs as designed.
Noise complaints are among the most common issues in new construction, and fixing them after the fact is always more expensive than getting it right the first time. By avoiding these ten soundproofing mistakes and working with experienced acoustic consultants, architects and contractors can save time, reduce liability, and deliver projects that perform as promised.
FAQs: Soundproofing Mistakes Builders Must Avoid
What’s the biggest soundproofing mistake architects make?
Relying on wall thickness instead of airtight detailing is a common error. Even high-STC walls fail if outlets align, seals are skipped, or RC is grounded.
Can resilient channel be used behind mounted objects?
No. TVs, cabinets, and shelves create rigid connections that kill isolation—a classic soundproofing mistake that compromises performance. Plan anchors early and use drywall-only anchors so the resilient channel stays decoupled.
What’s the difference between soundproofing and sound masking?
Soundproofing blocks sound between rooms, while sound masking adds background noise for speech privacy. It can’t replace isolation but works well in offices and clinics.
Does more insulation mean better soundproofing?
Not really. Fiberglass, mineral wool, and cotton perform similarly. Sealing gaps and decoupling drywall matter far more than insulation type.
Why is it expensive to fix soundproofing mistakes after construction?
Because isolation is built into the structure. Once finishes are up, improving STC or IIC means tearing back to studs. Early detailing and testing prevent expensive rework later.